First, It can help, to change keyboard layout in PFSense (will reset at next reboot) kbdcontrol -l /usr/share/syscons/keymaps/[YOUR LOCALE LANGUAGE].iso.kbd
WAN/LAN configuration
WAN is the wide area network, and is often considered the “outside” network. Internet is a type of WAN, but It could be your entire company network. It usually means “this is a network which has no finite geographical limit, systems could be anywhere in the world”.
We want this WAN to be able to access the Internet in our case, and our main objective is to ping a popular DNS IP (like cloudfare 1.1.1.1 or google 8.8.8.8) and receives a response back. This means checking for ICMP filtering, and having a public IP.
For this, we will be running this inside an hypervisor called ESXi, and with several public IPs provided by my service provider (I bought a whole block, registered to RIPE).
First, let’s create our network bridge. We want our private network to be able to reach public network, but we don’t want random public network to poll our private network. That means they need to communicate through a firewall, that’s PFSense.
First, our public network is defined with this IP block, this is what I was assigned to:
1
2
3
4
5
Public IP:  141.95.187.105

Gateway:    141.95.187.110

Netmask:    255.255.255.248 (/29)
We now have two choices:
- Create our PFSense, assign it this IP and create two VLANs that will act as WAN and LAN.
- Create vNIC together with vSwitch in our hypervisor ESXi that will act as our LAN network.
Question is: do we create our LAN network at the hypervisor level, or VM level ? Both could work (see router on a stick) But It’s recommended to create them at the hypervisor level, as It makes it way easier to create new VMs in this LAN network, and in PFSense, you can restart one network adapter without bothering the other.
So let’s create our vSwitch and vNic, check out this post to understand why Nic are needed
We create our vSwitch by indicating which uplink we want (physical network adapter on ESXi), I have two availables:
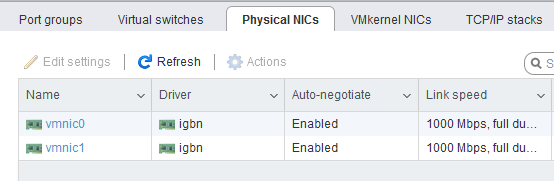
One is used for the ESXi management (vmnic0), the other is free to use, so we create our vSwitch named vSwitchLab:

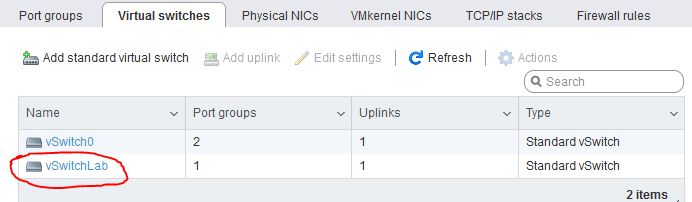
Then we create a port groups, that will be standing behind this vSwitch, we call it Lab Network

and we create our vNic to stand on the other side:

You might notice It created an IP automatically : 192.168.1.100 - It is a private network
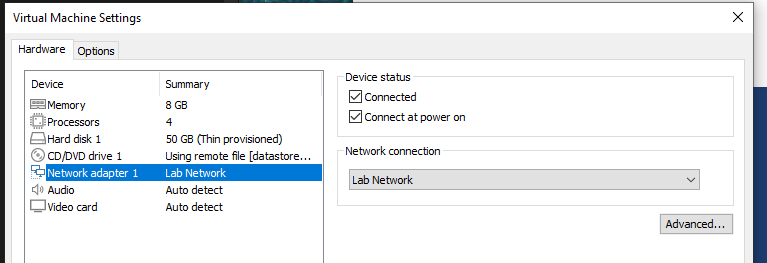
And now, we are ready to create our PFSense VM, with two network adapters :
- One for our WAN
- One for our LAN
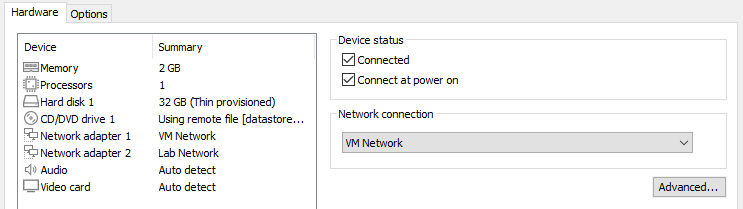
One detail to note, we need to assign a MAC address on our outside-facing network card, as It will be facing the Internet. This MAC address will be linked with our public IP.
On this first network adapter, we use “Advanced…” and assign its MAC address. One detail is If we create VLAN from this network adapter, they will all share the same MAC address.
Now we can start our PFSense, and after installation, we are greeted by this menu:
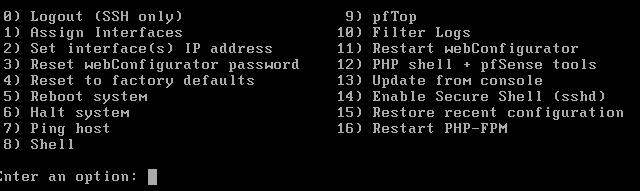
We want to first assign interfaces, and then set our interface(s) IP address.
When assigning interfaces, we want:
- em0 (VM Network) to be our WAN
- em1 (Lab Network) to be our LAN
Do not create any VLAN or downgrade the console to http, It is not needed.
Then we set our IPs, they are static on both sides, since we do not have a DHCP server assigning them:
- em0 <-> WAN <-> Public IP: 141.95.187.105/29 with gateway 141.95.187.110
- em1 <-> LAN <-> Private IP: 10.0.0.1/24 (could have used up to /8) with no gateway (as we are our own gateway)
I could have used any IP in available private subnets : 10.0.0.0/8, 172.16.0.0/12 or 192.168.0.0/16
Let’s try to ping an outside of network DNS:
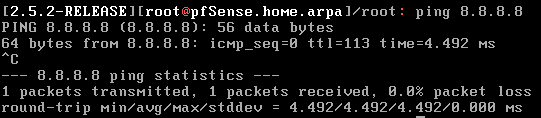
Our firewall is able to ping outside network, all is left is to create a VM with a GUI in the LAN network to reach PFSense web interface, and have it able to reach outside network by going through our PFSense firewall.
Installing a lab in our LAN
Network connectivity
Reasoning
Note: I will be using a CentOS 9 Stream, which came out this month.
When creating the VM in ESXi, create a network adapter assigned to “Lab Network”
After installing our OS, our system is unable to connect to its network. This is normal as he doesn’t have a DHCP server to give him his IP, we have to manually set it up.
For this, I will be using NetworkManager CLI, also named nmcli, as It’s better suited for scripting and I want to test it out. Others setups will probably prefer using configuration files, and that would have been my first choice had I not decided to try out this CLI.
My end goal would be to include the next commands in my Ansible playbook when I want to create more VMs.
Set up static IP through nmcli
First, we check which devices we will use:

ens32 will be our dedicated device. Here nmcli dev stands for nmcli device status - It’s a nice shortcut.
It’s possible to create this device through nmcli but we already did that when creating the VM.
Our network, as defined in PFSense, will look like this:
1
2
3
4
5
6
7
Network:    10.0.0.0/24

Gateway:    10.0.0.1

Broadcast:  10.0.0.255

Mask(/24):  255.255.255.0
Since this is our first system we set up in this network, let’s just increment and use the first available IP: 10.0.0.2
For others installations, we will try to have a DHCP server to assign this automatically.
nmcli connection modify ens32 ipv4.addresses "10.0.0.2/24" ipv4.gateway "10.0.0.1 ipv4.method "manual" ipv4.dns "10.0.0.1"
Our device is now set with his static IP, and indicating the gateway creates the route. Be careful as the default connection is usually with DHCP activated (ipv4.method set to manual instead of auto)
If you need to check all availables variables, check out your configuration in /etc/NetworkManager/system-connections/[CON-NAME].nmconnection

All green, all good ! Let’s try to ping our gateway:

Naturally, It works, as we are in the same LAN as defined on ESXi and our VM configuration. But can we reach outside network ?
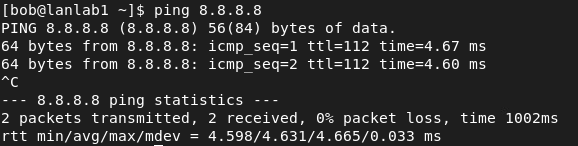
We can, great ! If that didn’t work, we could have looked into the ICMP traffic, if PFSense was rejecting them by default.
Now we can connect to PFSense GUI and start enhancing our setup from our CentOS in LAN
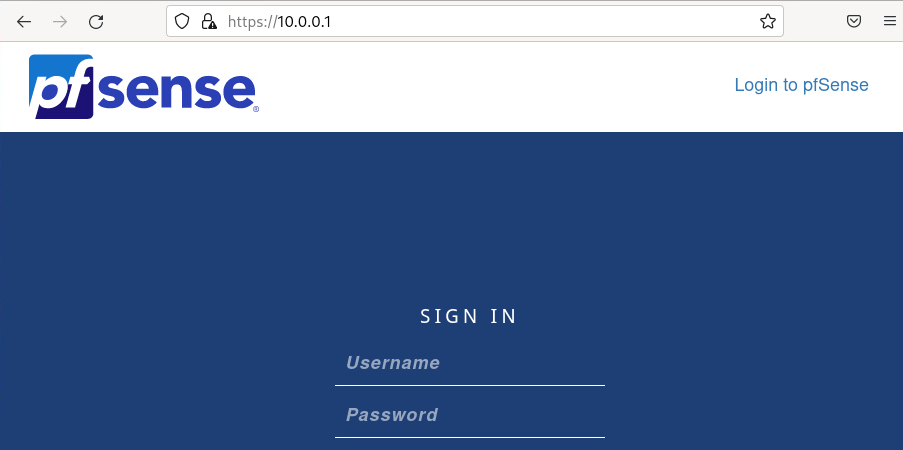
By default, this GUI is only available on the LAN side, as to not expose it to outside network (how easy would It be to scan IPs for PFSense first install).
Default user is admin / pfsense
And we are good to go !

All is left is to add some firewall rules, create new VMs in this network, and we are all set !
We end up with this infrastructure:

Lanlab(s) will be used to host kubernetes nodes, and esxi-lab is here for quick services testing.
For next hosts, we can rename them with
hostnamectl set-hostname lanlabX
Then reboot.
If you can’t resolve DNS entry (you can wget http://1.1.1.1 but not wget http://google.com), check your configuration in /etc/resolv.conf ; I had to reboot on mine, even though nmcli worked on others hosts..
Configuring PFSense
Now that we have a working traffic network, we need to set up some policies.
Let’s use PFSense GUI -> System -> Setup Wizard
We don’t have anything to change, besides maybe your DNS server, just make sure on step 4/9 to select Static and not DHCP.
Next, we want to set up SSH tunneling, so we can SSH from a remote terminal into our lan-lab networks.
In System -> Advanced -> Check Enables ssh-agent forwarding support - This will allow us to authenticate with our local RSA key when tunneling instead of PFSense’s one.
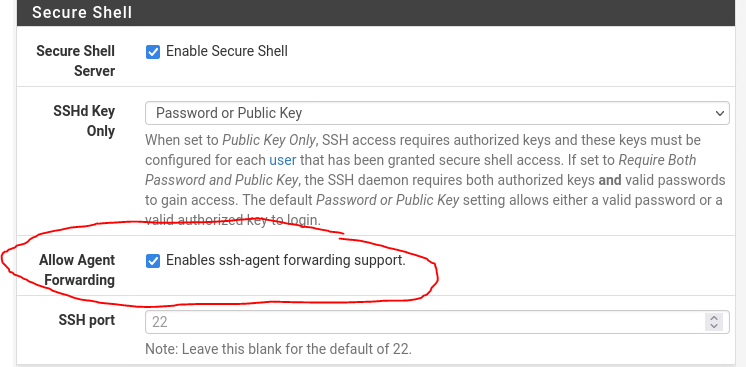
Don’t forget to remove Password authentication in the long-run and only allow public key authentication.
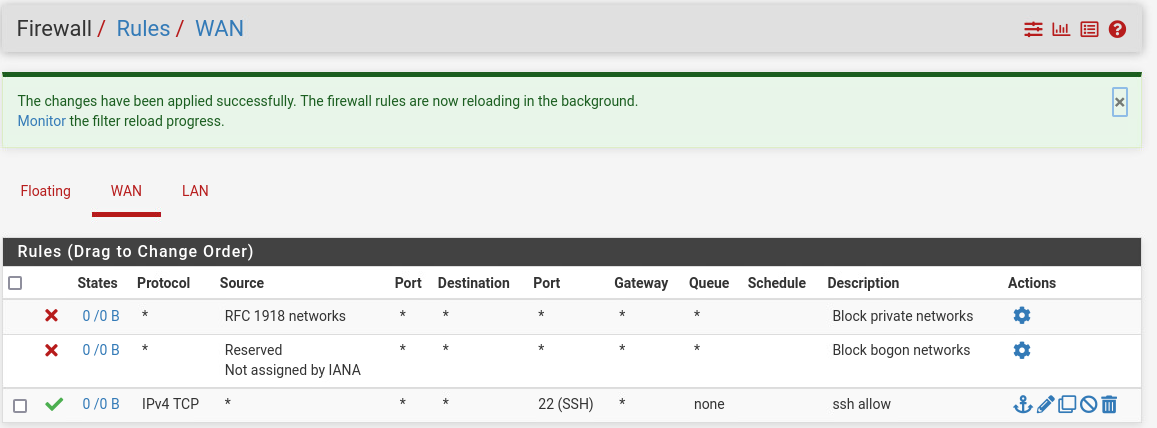
Now we need to authorize some ports from WAN into our LAN. You can check out some common skeleton, but It really depends on your infrastructure. As for mine, I’m still modifying it heavily.
For now, we will just authorize SSH connections in our network.
SSH Tunneling
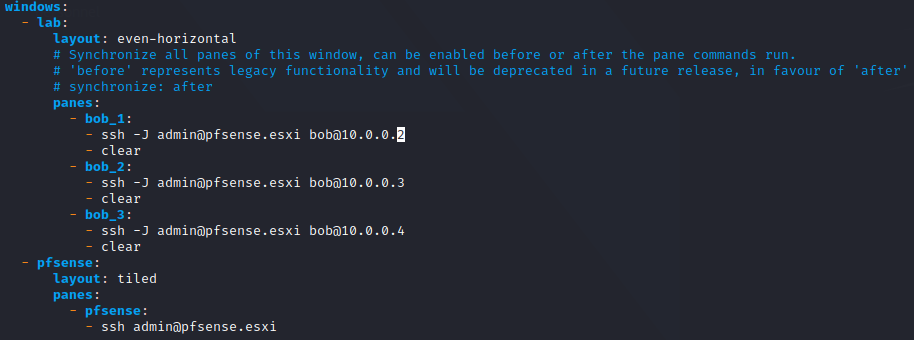
We want to connect from a remote terminal in our lanlab systems, we will try to connect through a SSH tunnel by bouncing off PFSense into our Lab network.
We will be using our ~/.ssh/rsa_pub.key from our local terminal.
We go back on PFSense, and on the GUI (User Manager -> Edit -> Authorized SSH Keys), we add our key (you could also add it through the terminal).
Since our plan is : (Local Terminal) –> (PFSense) –> (Remote lab), we will use ssh -J USER@PFSENSE USER@LAB

Of course we could use a ProxyCommand file to avoid using this jump everytime. Let’s disable password authentication on PFSense after we have spread our id_rsa.pub
After adding a DNS entry for PFSense (too lazy to remember the IP), I have this configuration for accessing my LAB:
I can’t use DNS entries for the systems inside the LAB, as PFSense can’t make the link between it yet (He doesn’t have any DNS or DHCP server with those entries yet).
Now, we are ready to connect into our infrastructure:

This should not be our final setup, as we will want to use OpenVPN at one point instead of this tunnel, and some DHCP/DNS, but It’s working well for now. There is still much more to do with setting up a DEV/UAT/PROD environment.
Credits
https://docs.ovh.com/au/en/dedicated/pfSense-bridging/#requirements
https://access.redhat.com/documentation/en-us/red_hat_enterprise_linux/7/html/networking_guide/sec-configuring_ip_networking_with_nmcli